Home
Introduction
Xposome is a shiny application that aims to build a repository of gene expression datasets that profile the transcriptomic responses to exposure of known toxins.
There are two types of the Xposome applications that you can install on your local machine:
- Xposome with GeneHive database incorporated
- Xposome without GeneHive database
In this post, I will go over instructions on how to install the Xposome application without relying on GeneHive database on your local machine. If you are interested in incorporating GeneHive as a database, please contact us at montilab@bu.edu for further implementation.
Local Installation
Must have R and Rstudio installed before proceeding:
To run the Xposome application:
- Download the zipped codebase from our GitHub repo
- Unzip the file and navigate to the shinyApps folder
- Within the shinyApps folder, open the app.R file with Rstudio
- After the file is opened in Rstudio, click on the “Run App” button located on the top right corner of the program to launch the application
Folder Structure
Xposome-local
- shinyApps
- data User_Login_List.csv
- www
- CSS style.css
- JS Javascript.js
- IMAGES github_logo.png
- HTML publications.html
- shinyApps-log
- dockerfile
- shiny-server.sh
Project_List.csv
main_style.css
LoginStyle.css
ModeratorStyle.css
home.R
overview.R
portal.R
sign_in.R
other *.R files
Dockerize The Xposome Application
Not familiar with Docker? You can download it here and then check out the R Docker tutorials.
To check if docker is installed.
To dockerize the Xposome application with GitHub:
- Download the zipped codebase from our GitHub repo
- Unzip the file and open the terminal
- cd to where the dockerfile is stored. Note: the dockerfile is a text file that contains all of the dependencies and instructions on how to run the Xposome application.
- To build a docker image for the Xposome application, run the following command
docker build -t xposome:latest .-t is used to add a tag to an image such as the version of the app, i.e. xposome:2.0.1 or xposome:latest
Note: the build will take some time as it depends on a number of system dependencies and R packages
After the build is completed, you can check if the image is built successfully.docker images - Next, create a docker container that utilizes the Xposome image and publishes the application on the host machine.
docker run -d -p 3838:3838 \-d is used to run the container in detached mode
-v shinyApps/:/srv/shiny-server/ \
-v shinyApps-log/:/var/log/shiny-server/ \
xposome:latest
-v is used to mount the code base or data files from the host directory to the container directory <host_dir>:<container_dir>
-p is used to link the container port to the host port and publish the application thru the host port <host_port>:<container_port>
For more information about the syntax usage, see docker documentation
To check if the container is built and running sucessfully,
docker container ps - Lastly, you can visit the local host on your machine, i.e. http://localhost:3838, to check if the application is indeed hosted there.
To dockerize the Xposome application with Docker Hub:
- The docker image for the Xposome application is available on Docker Hub. To pull the image, just type the following command in the terminal:
docker pull montilab/xposomeTo check if the image is built successfully.docker images
- Follow the step 4 and 5 of “Dockerize the Xposome application with GitHub” to build the docker container for the Xposome applicaton
Additionally, check out our documentation on how to create an encrypt HTTPS traffic to the Xposome application with NGINX and Docker-Compose
Data Access
The Xposome application requires several structural datasets in order for it to run smoothly. We do provide API access to our data, see our API Explorer.
Application Usage
The Xposome shiny application contains four pages:
The Home Page
Gives a general description about the Xposome Portal and its usage

The Overview Page
Provides information about the datasets that are currently available on the Xposome Portal

The Portal Page
Enables interactive exploration of expression profiles of a list of projects currently existed on the Xposome Portal that were exposed to a panel of known carcinogens. Below is the portal page of the Adipogenicity Project which associated with 3T3-L1 cell line.

The Sign-In Page
Allows only authorized users to log into the Xposome database and make changes to the existed screens or to upload new screens onto the portal
The default login credentials:
Username: XposomePassword: Xposome
Note that the password is encrypted using a sodium R package. See details here
Lastly, check out our documentation on how to reset password if users forgot their login credentials using Send Emails with Postfix.

Links
- Browse source code at
https://github.com/montilab/Xposome/
Developers
- Reina Chau
Author, maintainer - Stefano Monti
Author


Developed by Reina Chau, Stefano Monti.
Site built with flexdashboard 0.5.2
NGINX and Docker-Compose
NGINX & Docker-Compose
NGINX - An open source web server and reverse proxy technology used for hosting websites and applications
Docker-Compose - A technology for enabling docker containers to communicate to each other
In this post, I will go over steps on how to create an encrypt HTTPS traffic that allows users to interact with the Xposome application that is published thru a docker container. To achieve that, we need both NGINX and docker-compose.
Here are the seven steps to set-up NGINX and docker-compose:
- Install docker-compose
- Build a NGINX image from Docker Hub without the need of installing NGINX software
- Dockerize the Xposome application locally or pull the image from Docker Hub
- Set up NGINX configuration files (i.e. nginx.conf and default.conf.template)
- Create a YAML file for docker-compose (i.e. docker-compose.yml)
- Run the docker-compose.yml file
- Check to see if the application is running on HTTPS
Step 1: Install docker-compose
Check out how to install Docker-compose here
To check if docker-compose is installed,
docker-compose --version
Step 2: Build a docker image for NGINX
A docker image for NGINX can be found on Docker Hub. You can pull this image without the need to install NGINX software on your local machine.
docker pull nginx:latest
To check if the image is built successfully,
docker images
Also see this link on how to use the NGINX image
Step 3: Dockerize the Xposome application locally or pull the image from Docker Hub
You can check out this step on my previous post here for more details
Step 4: Set-up NGINX configuration files
Once the docker images for NGINX and the Xposome application are built successfully, we can start setting up the NGINX configuration files. There are two configuration files for NGINX: nginx.conf and default.conf.template.
The nginx.conf contains the standard configuration for NGINX. Unless you know how to add directives to this configuration file, otherwise I do not recommend making any changes to this file.
Here is a snapshot of nginx.conf file:
# For more information on configuration, see:
# * Official English Documentation: http://nginx.org/en/docs/
# * Official Russian Documentation: http://nginx.org/ru/docs/
user nginx;
worker_processes auto;
error_log /var/log/nginx/error.log;
pid /run/nginx.pid;
# Load dynamic modules. See /usr/share/doc/nginx/README.dynamic.
include /usr/share/nginx/modules/*.conf;
events {
worker_connections 1024;
}
mail {
server_name 155.41.202.164;
auth_http 155.41.202.164:3838;
proxy_pass_error_message on;
server {
listen 25;
protocol smtp;
smtp_auth login plain cram-md5;
}
}
http {
map $http_upgrade $connection_upgrade {
default upgrade;
'' close;
}
log_format main '$remote_addr - $remote_user [$time_local] "$request" '
'$status $body_bytes_sent "$http_referer" '
'"$http_user_agent" "$http_x_forwarded_for"';
access_log /var/log/nginx/access.log main;
sendfile on;
tcp_nopush on;
tcp_nodelay on;
keepalive_timeout 65;
types_hash_max_size 2048;
# set client body size to 8M #
client_max_body_size 1000M;
include /etc/nginx/mime.types;
default_type application/octet-stream;
# Load modular configuration files from the /etc/nginx/conf.d directory.
# See http://nginx.org/en/docs/ngx_core_module.html#include
# for more information.
include /etc/nginx/conf.d/*.conf;
}
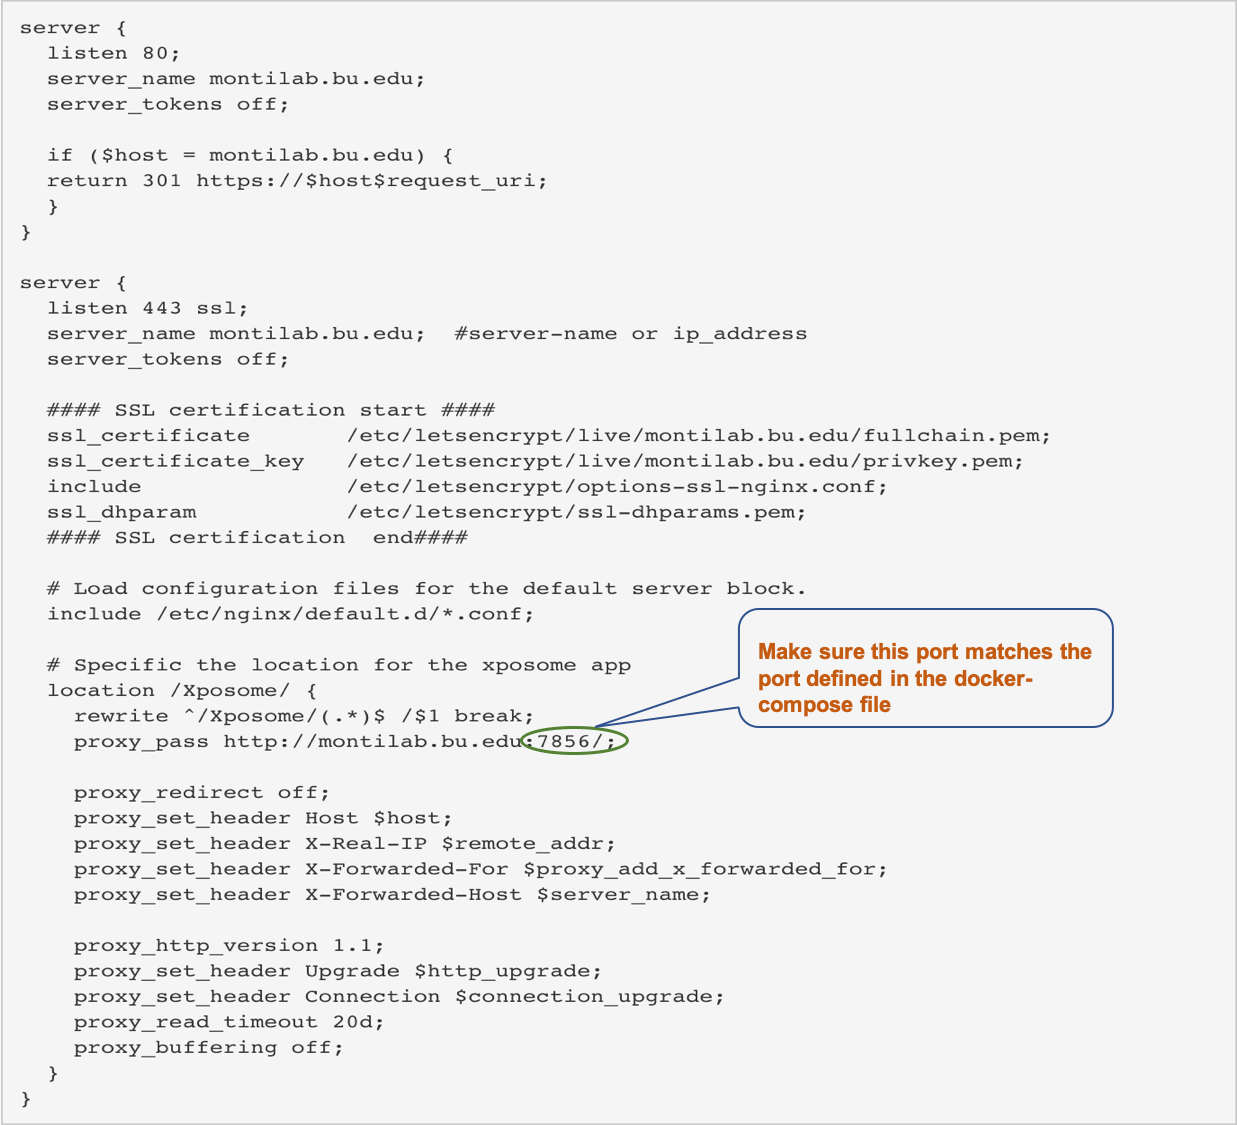
The default.conf.template contains instructions on how to direct and encrypt any traffics to the Xposome application with HTTPS protocol that is published thru a specific port on the host machine.
How NGINX, Docker, Shiny talk to each other
With NGINX,
nginx → listens on → port 80 (http) and 443 (https)
With Docker,
Docker → listens on → port 80/443/8080/3838/8000/…
With SHINY
Shiny → listens on localhost (127.0.0.1) → port 3838/8787/4848/…
In brief, when we run a docker container, we basically expose our shiny application through a port, i.e port 3838, on the localhost. Docker is then listened to this port and redirects the application to a host port, i.e port 7856, on the host machine. If the host machine has a domain, for example, montilab.bu.edu (in my case), then we can navigate to http://montilab.bu.edu:7856 and check to see if the Xposome application is indeed hosted there.
Shiny:localhost:3838 → http://montilab.bu.edu:7856
Nevertheless, we do not want to provide a link to an application with a port number and furthermore the link is not encrypted with HTTPS. Thus, we can use NGINX to create an alias name for the application (for example: https://montilab.bu.edu/Xposome/), and then redirects and encrypts any traffics to the application with HTTPS using Certbot, a free, open source software tool for automatically using Let’s Encrypt certificates on manually-administrated websites to enable HTTPS. As a result, NGINX is served as a reverse proxy for hosting our applications.
Shiny:localhost:3838 → http://montilab.bu.edu:7856 → https://montilab.bu.edu/Xposome/
Here is a snapshot of default.conf.template file:
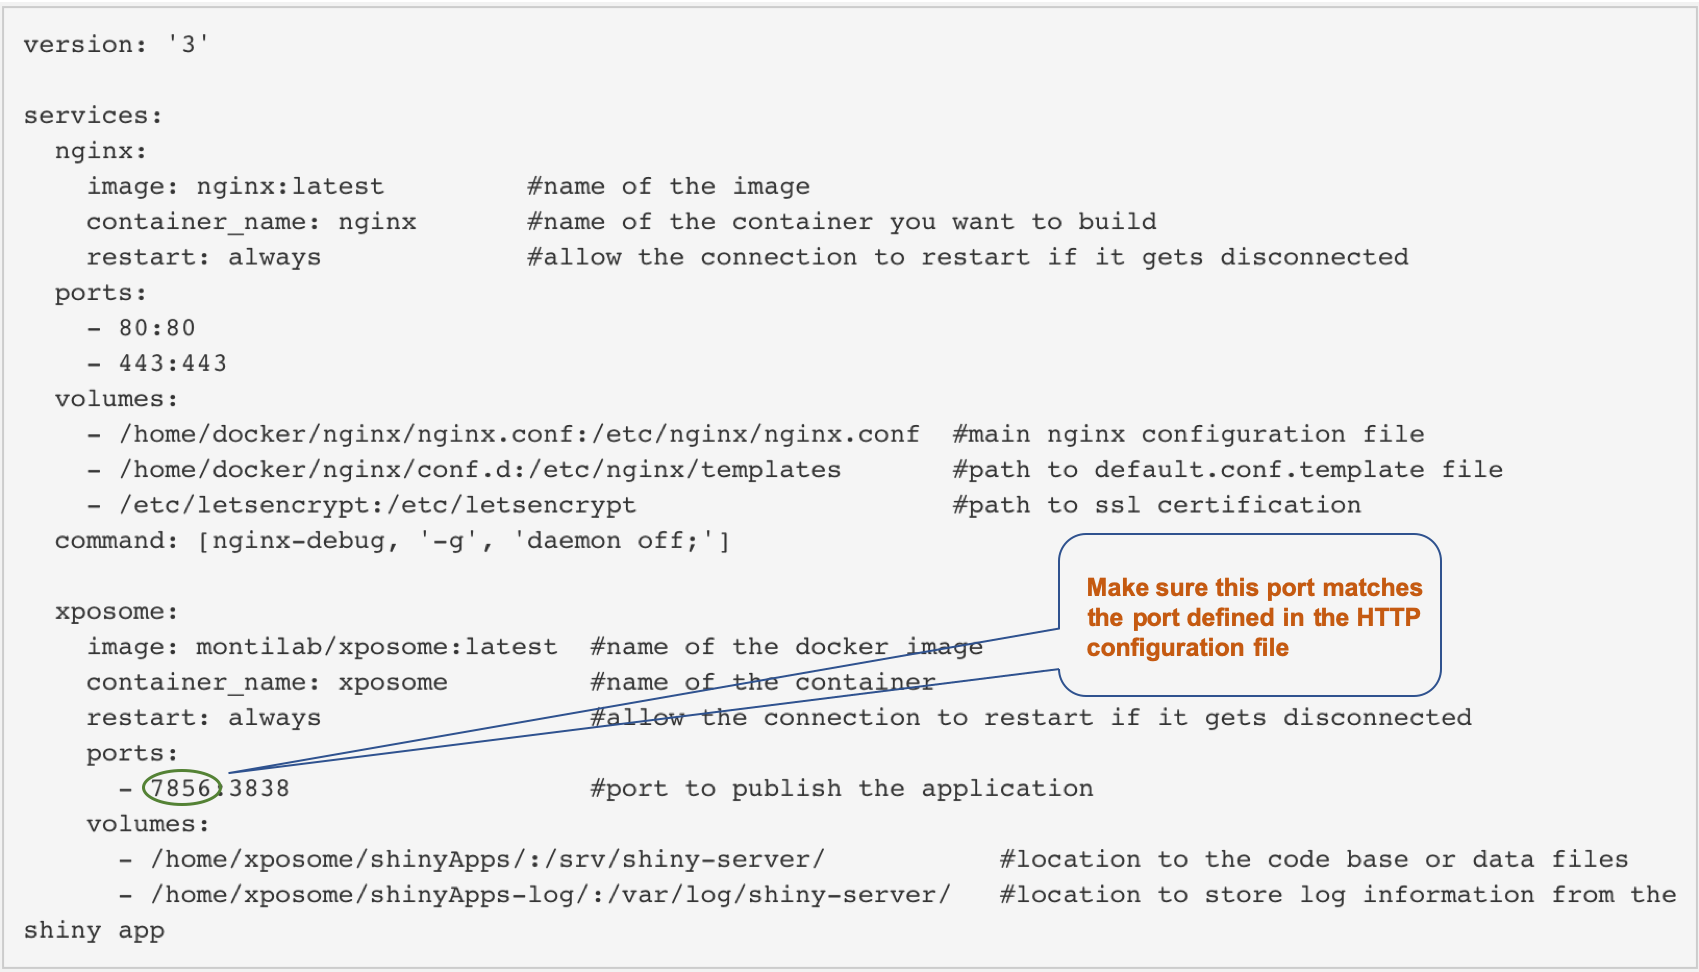
Step 5: Create a docker-compose.yml file
Once we had configured NGINX as a reverse proxy for our application, we can create a docker-compose.yml file that allows communication between the Xposome and NGINX containers.
To enable communication between containers, in the docker-compose.yml file, we must create a service to run the NGINX container and a service to run the Xposome container. Under each service, we need to specify a list of instructions on how a container can be built, for instance, what image is used to build the container, what do we want to name the container, which port do we used to expose the shiny app to Docker, and which port do Docker use to publish the app on a specific port of the host machine, etc.
After we had all of these key components defined, the last step is to make sure that the host port on the docker-compose.yml file matches the port defined in the nginx.conf file.
Here is a snapshot of the docker-compose.yml file:
Step 6: Run the docker-compose file
After we had the docker-compose file and the NGINX configuration files all set up, we can cd to where the docker-compose.yml file is located at and run the following command to fire up all the containers.
docker-compose up -d
-d is used to run docker compose in detach mode
Step 7: Check to make sure the application is running on HTTPS
If the containers is built without any errors. We can navigate to the alias address of the Xposome application (i.e. https://montilab.bu.edu/Xposome/ in my case) and see if the application is indeed hosted there.
Links
- Browse source code at
https://github.com/montilab/Xposome/
Developers
- Reina Chau
Author, maintainer - Stefano Monti
Author
Developed by Reina Chau, Stefano Monti.
Site built with flexdashboard 0.5.2
Send Emails with Postfix
Send Emails with Postfix
Postfix - A popular open-source Mail Transfer Agent (MTA) that can be used to route and deliver emails on a Linux system
Docker - A software platform that allows developers to build, test, deploy, and run applications using containers
In this post, I will go over tutorials on how to send emails from a docker container using Postfix installed on the host machine. In my previous posts, I mentioned how you can dockerize the Xposome application. The Xposome application has four pages: Home Page, Overview Page, Portal Page, and Sign-In Page. In the Sign-In Page, there is an option that allows users to retrieve their passwords if they forgot their login credentials. Postfix is actually used here to send a notification email to the users with a temporary password that allows them to gain access to the portal again.
Here are the five steps to set-up Postfix and send new passwords to users as they forgot their login credentials:
- Install Postfix
- Dockerize the Xposome application locally or pull the image from Docker Hub
- Configure Postfix to listen to requests from the Xposome containers
- Write an email to test the Postfix Mail Server
- Check to see if the email is sent correctly
Step 1: Install Postfix
Depending on your Operating System, for mine, I have CentOS 8 server. Therefore, I will use this documenation on how to install and configure postfix mail server on CentOS 8. You can also see this link to install and configure Postfix on Ubuntu 16.04.
Step 2: Dockerize the Xposome application locally or pull the image from Docker Hub
See my previous post here for more details
Step 3: Configure Postfix to listen to requests from the Xposome container
After Postfix is installed, the main configuration files is stored at /etc/postfix/main.cf.
To configure Postfix to listen to requests from the Xposome container, there is something called docker bridge (docker0) which acts as a bridge between the ethernet port and the docker container so that data can go back and forth. Hence, we want Postfix to listen on the docker0 interface. To do that, type ifconfig on your host system to find out the bridge address and set your Postfix to listen on it.
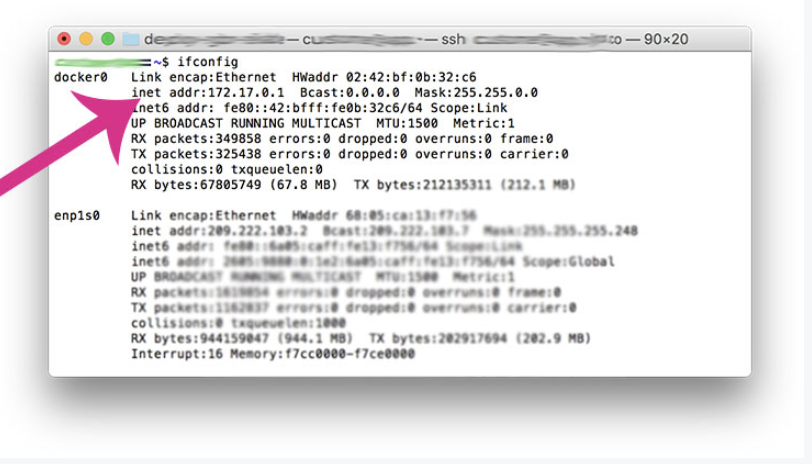
As you can see in the image above, the IP address is 172.17.0.1
In the Postfix configuration file (/etc/postfix/main.cf), set
inet_interfaces = 172.17.0.1
While you are there, add your actual docker container ip address to mynetworks
mynetworks = 172.17.0.5
172.17.0.5 is the private IP address of the Xposome container on my machine
You can find the IP address for your docker container by
docker inspect [container_id/container_name]
Step 4: Write an email to test the Postfix Mail Server
Here is an email function (written in R) that sends a temporary password to users who forgot their login credentials:
sendpassword <- function(from_sender="montilab@bu.edu", to_recipient="montilab@bu.edu", recipient_first="Montilab", recipient_last="Montilab", recipient_account="Montilab", tmp_pwd){
recipient=paste(recipient_first, recipient_last)
msg <- mime_part(
paste0(
'<!DOCTYPE>',
'<html>',
'<head>',
'<meta http-equiv="Content-Type" content="text/html; charset=utf-8"/>',
'<meta name="viewport" content="width=device-width, initial-scale=1.0"/>',
'<title>HTML MESSAGE</title>',
'<style type="text/css">',
'</style>',
'</head>',
'<body>',
'<p>Hi <strong>', recipient_first, ',</strong></p>',
'<p>The password for your Xposome account has changed.</p>',
'<p></p>',
'<p>Username: <strong>', recipient_account, '</strong></p>',
'<p>Temporary password: <strong>', tmp_pwd, '</strong></p>',
'<br>',
'<p>Log back in? Follow this link, <strong>https://montilab.bu.edu/Xposome/?page=sign_in</strong></p>',
'<br>',
'<p>Best,</p>',
'<p>Montilab Team</p>',
'</body>',
'</html>'
)
)
## Override content type.
msg[["headers"]][["Content-Type"]] <- "text/html"
from <- paste0("\"Montilab Team\"<", from_sender, ">")
to <- paste0("\"", recipient, "\"<", to_recipient, ">", collapse="")
subject <- "Temporary password for Xposome"
body <- list(msg)
sendmail(from, to, subject, body, control=list(smtpServer="smtp.bu.edu", smtpPort="25"))
}
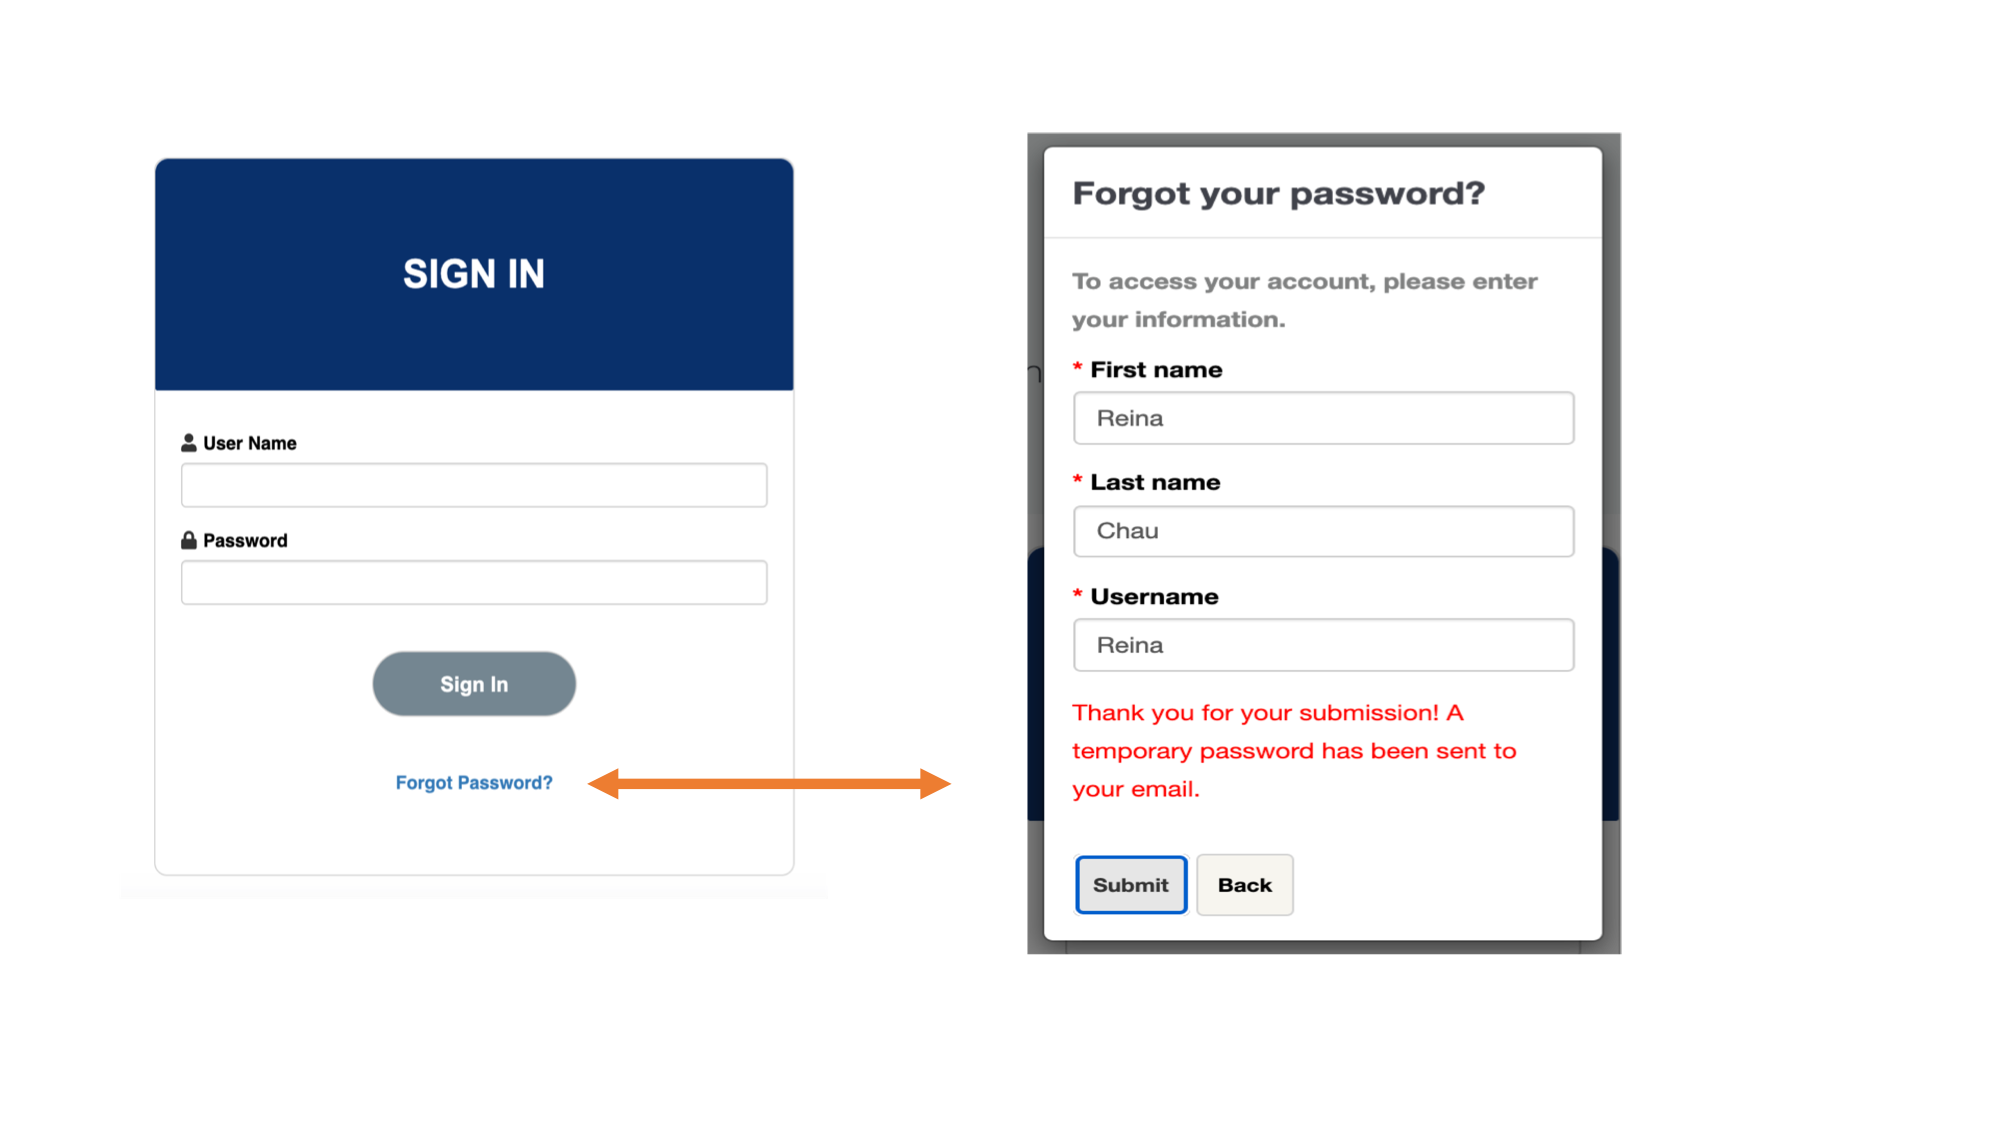
On the Xposome application, there is a Sign-In Page. When a user clicks on the forgot password? link, a modal dialog will pop up. The modal dialog requires the users to provide their user account information and by clicking on the submit button, a new temporary password will be send to his/her email. Afterward, they can use the temporary password to log back into the Xposome database and make edits to the portal.
Here a snapshoot of the modal dialog in the Sign-In Page:
Step 5: Check to see if the email sent correctly
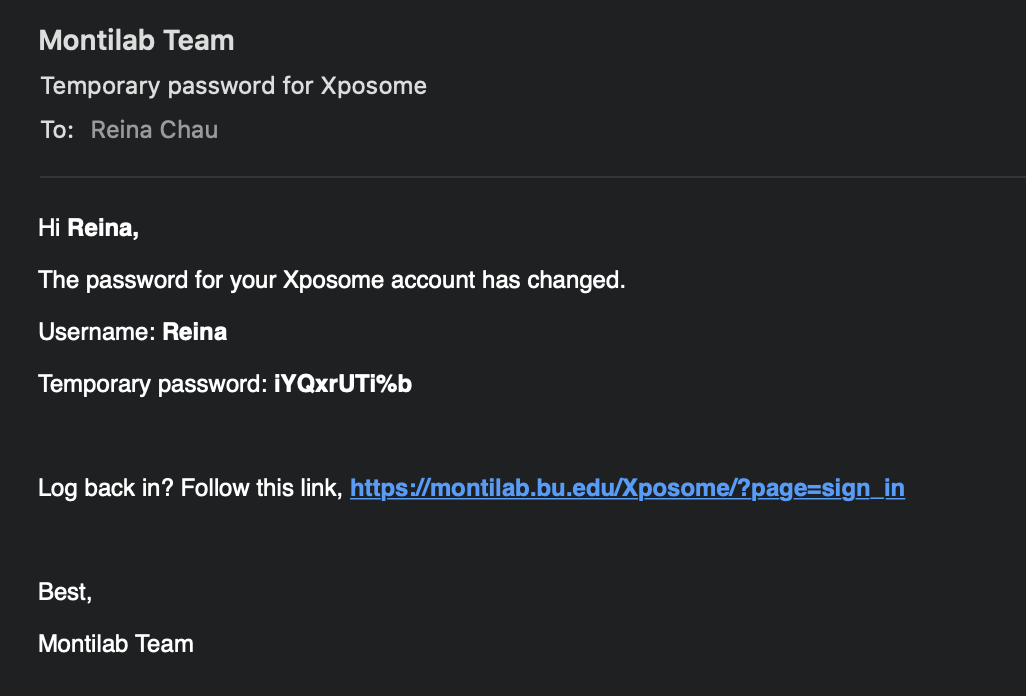
If you are using the same email format that I have structured above, you should receive an email similar to this one.
Links
- Browse source code at
https://github.com/montilab/Xposome/
Developers
- Reina Chau
Author, maintainer - Stefano Monti
Author
Developed by Reina Chau, Stefano Monti.
Site built with flexdashboard 0.5.2
API Calls
API EXPLORER
The API Explorer provides documentation on how users can retrieve data from the Xposome application and use them to create their next project. All successful responses are returned in JSON. Only queries that respond with a 200 response code is considered successful.
Here are standard HTTP codes that you will find in the “Status” element of the response body.
| Status Code | Description |
| 200 OK | Standard HTTP successful response |
| 404 Bad Request or Source Not Found | Standard HTTP invalid request response |
| 500 Internal Server Error | There was an unexpected error on our server. If you see this error, please notify us about the issue on our GitHub page |
There are four data sources that are currently returned from the API.
| Data | Description | Return |
| Projects | a list of projects or chemical screenings available in the GeneHive Database. Visit our webpage to see on how we define each project | list |
| Chemicals | a list of chemicals/cas ids available in a particular project in the GeneHive database | data frame |
| Datasets | a list of data sources for generating the Xposome Portal such as profile and chemical annotation, expression set, gene set enrichment, connectivity set, and K2-taxonomer | data frame or RDS file |
| RDS Bundle | a bundle of RDS files for a given Xposome project, including profile annotation, chemical annotation, expression set, gene set enrichment, connectivity set, and K2-taxonomer | zip file |
| Statistics | a summary of statistic given by a chemical in a Xposome project of interest. The statistics are calculated based on the scores obtained from the expression set, enrichment set and connectivity set | data frame |
Below are a list of R packages and GET requests in R to retrieve data from the Xposome projects. However, one can use Python or other programs to implement the REST API calls.
# R packages required for API calls
library(K2Taxonomer)
library(Biobase)
library(jsonlite)
library(httr)
Projects
| /projects | Return a list of projects available in the GeneHive database |
Chemicals
| /chemicals | Return a list of chemicals/cas ids available in a particular project in the GeneHive database |
Datasets
| /profile_annotation | Return the profile annotation of a specific project |
| /chemical_annotation | Return the chemical annotation of of a specific project |
| /expression_set | Return the gene expression dataset of a specific project |
| /enrichment_set | Return the enrichment dataset of a specific project |
| /connectivity_set | Return the connectivity dataset of a specific project |
| /k2_taxonomer | Return the K2Taxonomer dataset of a specific project |
RDS Bundle
| /rds_bundle | Return a bundle of RDS files for a given project |
Statistics
| /gene_expression | Return a collection of differential expressed genes that exposed to a known toxin |
| /gs_enrichment | Return a collection of gene set enrichment that was exposed to a given drug |
| /connectivity | Return a collection of gene connectivity that are linked to exposure of a known chemical |
Additionally, we provide direct links to query contents on our website. See Links to Application.
Links
- Browse source code at
https://github.com/montilab/Xposome/
Developers
- Reina Chau
Author, maintainer - Stefano Monti
Author
Developed by Reina Chau, Stefano Monti.
Site built with flexdashboard 0.5.2
Links to Application
Links to Application
We also provide direct links to our Xposome Portal. This feature allows users to connect information from their web application to our web page.
There are three types of information that users can link to our pages:
- Information Page - gives an overview description about the Xposome portal and how to use it, etc.
- Portal Page - enables interactive exploration of expression profiles that were exposed to a panel of known carcinogens based on a given portal
- Moderator Page - allows authorized users to log into the Xposome database (GeneHive) and make changes to the existed screens or to upload new screens onto the portal
Link to Information Page
| Parameter | Value | Description | Data Type |
| page |
- home - overview |
gives an overview description about the Xposome portal and how to use it, etc. | string |
Implementation:
https://montilab.bu.edu/Xposome/?page=home
Output:
This query links to The Home Page of the Xposome Portal. The page gives a general description about the portal and its usage
Implementation:
https://montilab.bu.edu/Xposome/?page=overview
Output:
This query links to the The Overview Page of the Xposome Portal. The page provides information about the datasets that are currently available on the GeneHive database
Link to Portal Page
| Parameter | Value | Description | Data Type |
| page | name of a particular project in the GeneHive database (see API Explorer on how to retrieve a list of project names) |
a project page on the Xposome Portal | string |
| tab |
- annotation - chemical_explorer - marker_explorer - heatmap_explorer - k2_taxanomer_results - compare_multiple |
a tab panel of a given project. Currently, there are six tab-panels available for a given project. | string |
| chemical_id | see API Explorer on how to retrieve a list of chemical ids/CAS ids/chemical names of a particular project | a chemical id/CAS id/chemical name of a given project | string |
| stat |
- gene_expression - gene_set_enrichment - connectivity |
a statistical tab-panel located in the Chemical Explorer tab of a given project. Currently, there are three statistical-tabs available for a given project. | string |
Implementation:
https://montilab.bu.edu/Xposome/?page=ADIPO&tab=annotation
Output:
This query links to the Annotation tab on the ADIPO Portal page

Implementation:
Output:
This query links to the Gene Expression subtab of Chemical Explorer tab on the ADIPO Portal page


Implementation:
Output:
This query links to the Gene Set Enrichment subtab of Chemical Explorer tab on the ADIPO Portal page


Implementation:
Output:
This query links to the Connectivity subtab of Chemical Explorer tab on the ADIPO Portal page


Implementation:
https://montilab.bu.edu/Xposome/?page=ADIPO&tab=marker_explorer
Output:
This query links to the Marker Explorer tab on the ADIPO Portal page


Implementation:
https://montilab.bu.edu/Xposome/?page=ADIPO&tab=heatmap_explorer
Output:
This query links to the Heatmap Explorer tab on the ADIPO Portal page

Implementation:
https://montilab.bu.edu/Xposome/?page=ADIPO&tab=k2_taxonomer_results
Output:
This query links to the K2 Taxonomer Results tab on the ADIPO Portal page


Implementation:
https://montilab.bu.edu/Xposome/?page=ADIPO&tab=compare_multiple
Output:
This query links to the Compare Multiple tab on the ADIPO Portal page

Link to Moderator Page
| Parameter | Value | Description | Data Type |
| page | sign_in | Allows only authorized users to access to the portal in order to make edits or to upload new projects to the GeneHive database | string |
Implementation:
https://montilab.bu.edu/Xposome/?page=sign_in
Output:
This query links to The Sign-In Page which allows only authorized users to log into the Xposome database and make changes to the existed screens or to upload new screens onto the portal
Links
- Browse source code at
https://github.com/montilab/Xposome/
Developers
- Reina Chau
Author, maintainer - Stefano Monti
Author
Developed by Reina Chau, Stefano Monti.
Site built with flexdashboard 0.5.2